Connecting to JBoss A MQ with HermesJMS
Recently my client asked me for information on how to connect to a JBoss A-MQ server with HermesJMS. I had connected with the Apache ActiveMQ servers in the past without issue, and the SoapUI website even uses ActiveMQ as its broker in all of its examples. I figured it wouldn’t be any different with A-MQ. Ultimately it was a simple process and very similar to connecting to ActiveMQ, however there are some gotchas that I will discuss in this article.
Before I get started I want to point a few things about HermesJMS in particular. While this is a very popular tool for testing and debugging a wide range of JMS servers, it is also fairly buggy and has not been updated since 2011. There are a number of quirky UI issues that sometimes result in having to enter information in fields multiple times, screens not appearing, and items not properly appearing in drop-down menus. The best workaround that I have found is to just Apply your changes frequently and whenever something isn’t sticking, close and re-open the window. This will generally solve the issue. With that in mind, lets get started.
Where are my libraries?
The first thing you will notice when trying to setup HermesJMS to connect to A-MQ is that the libraries you typically use to do so are not present in the base A-MQ installation. Most tutorials will tell you that you need the following two or three libraries:
- activemq-core-XXX
- activemq-all-XXX
- geronimo-j2ee-management_1.1_spec-1.0.1
however if go looking for these JAR files in the base installation you will only find geronimo. The activemq libraries are missing. However there is hope. Inside the extras folder in the root of your installation sits a zip file of the ActiveMQ distribution that A-MQ is built on. If you extract that zip archive, then all of the libraries that you need can be found inside. Specifically, the libraries that you will need are located at:
- $AMQ_HOME\extras\apache-activemq-5.9.0.redhat-610379-bin.zip\apache-activemq-5.9.0.redhat-610379\activemq-all-5.9.0.redhat-610379.jar
- $AMQ_HOME\extras\apache-activemq-5.9.0.redhat-610379-bin.zip\apache-activemq-5.9.0.redhat-610379\geronimo-j2ee-management_1.1_spec-1.0.1.jar
Once you have those libraries extracted then you can properly create you provider configuration inside of HermesJMS.
All HermesJMS are not created equal.
Initially I was trying to connect to the A-MQ server using the HermesJMS that ships with SoapUI. For reference, I was using SoapUI v5.0.0 and its packaged HermesJMS v1.14-SoapUI. I loaded up SoapUI, launched HermesJMS, and away I went. I followed all of the steps on the SoapUI JMS getting started tutorial and was met with total failure. After following all of the steps and creating my HermesJMS session, I tried to connect to my queue and was met with a ClassNotFoundException. Naturally I assumed I was missing a library. After extracting and checking all of the JAR’s I had included when creating my provider, I confirmed that the missing class was indeed available. I did some searching and I found bug HJMS-223. It has been around for some time now but has yet to be fixed. It appears to only impact ActiveMQ 5.8 and up. On a whim I decided to try the standalone version of HermesJMS v1.14. After installing it and re-creating my provider and session, I tried connecting to my queue and everything worked fine. My only conclusion for why this is the case is because SmartBear must be making changes or incorrectly packaging HermesJMS when they ship it with SoapUI. I tried to contact them to find out why this does not work with their version but works in the standalone version but did not receive a response.
So how do I make it work?
Ok, by now you probably just want to know how to make it work, right? Ok, lets get this thing working.
Setup JBoss A-MQ
If you have not done so already, go install JBoss A-MQ following the instructions outline in the installation guide. Once you have it installed go ahead and configure a remote user and then verify that your installation is working properly. Once that is complete, leave your server running and lets move on.
Extract the required libraries
At this point if you have not already extracted the following two JAR files from the ActiveMQ distribution that ship with A-MQ then you should do so now. Extract them and put them somewhere that you want lose them. I recommend just leaving them in the extras folder next to the zip archive you extracted them from.
- $AMQ_HOME\extras\apache-activemq-5.9.0.redhat-610379-bin.zip\apache-activemq-5.9.0.redhat-610379\activemq-all-5.9.0.redhat-610379.jar
- $AMQ_HOME\extras\apache-activemq-5.9.0.redhat-610379-bin.zip\apache-activemq-5.9.0.redhat-610379\geronimo-j2ee-management_1.1_spec-1.0.1.jar
Configure HermesJMS
Now that you have your files lets create the provider and session that we will use to connect to the A-MQ server. First step is to create a new session by going to Actions, New, New Session…
Create the Provider
Once the Preferences window is open, select the Providers tab. Right click on “Classpath Groups” and Add a new group named ActiveMQ. Next, right click on your new group and add the two libraries that we previously extracted. When prompted of you want to Scan or Dont Scan the libraries, select Scan. Once you are done click Apply to save your changes and create the provider. When completed your Providers tab should look similar to this one.
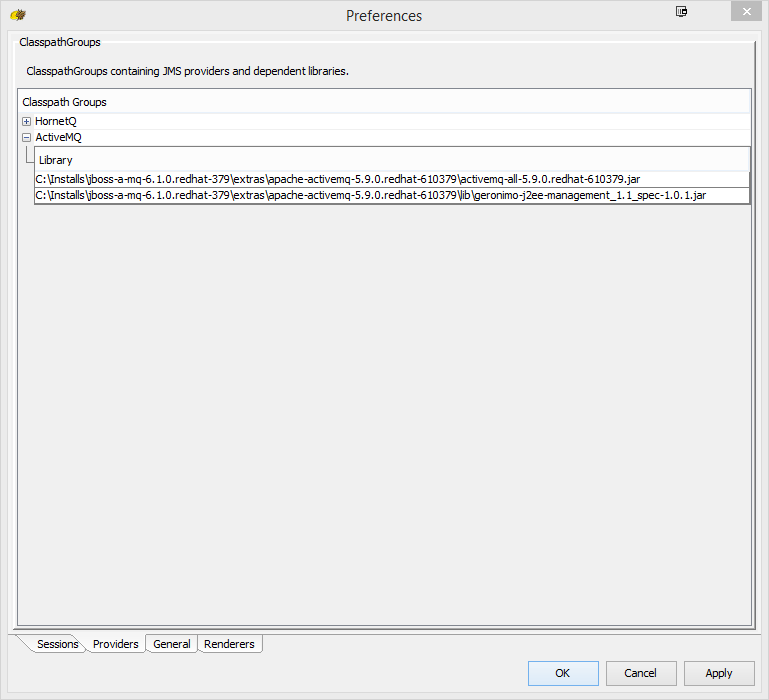
You may have additional providers listed in the Classpath Groups section if have done previous work with HermesJMS. In my case I have HornetQ added.
Create the Session
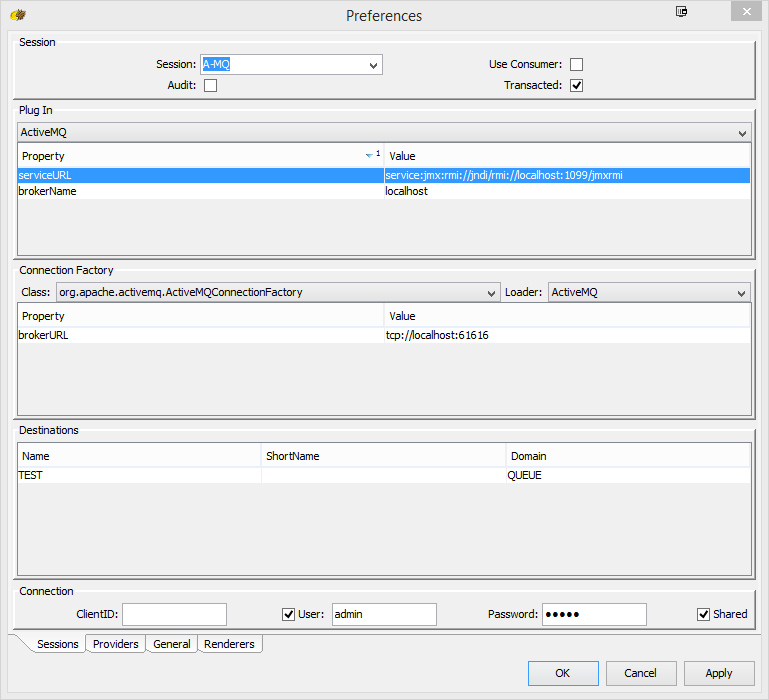
Now that the provider is ready, with the preferences window still open, select the Sessions tab. There are several things that need to be changed on this tab. First give the session a name in the Session textbox. I recommend calling it A-MQ.
The first section we are going to configure is the Connection Factory block. Change the Loader to ActiveMQ (or whatever you called your provider previously) and set the Class to org.apache.activemq.ActiveMQConnectionFactory. Now you need to add a new property. Right click in the properties box and select Add Property. Choose brokerUrl from the Property field drop-down and set the value to “tcp://localhost:61616”.
The second section to configure is the Plug In block. Select ActiveMQ from the drop-down and then add two new properties. For the first property select brokerName from the Property field drop-down and set its value to “localhost”. For the second property select serviceUrl and set its value to “service:jmx:rmi://jndi/rmi://localhost:1099/jmxrmi”.
The third section we will configure is the Destinations section. Be default there will be two destinations already created. Simply right click and delete both of them. Next right click again and choose add. Change the Name of the new destination to “TEST” since we are going to use the default test queue on the broker. If you have a different queue you want to use, set the name field to its name.
Finally, select the User check-box at the bottom of the page and enter the credentials for the remote user that you previously created. At this point your Session window should look like this one.
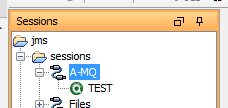
Once you have everything setup, click Apply and then Ok to close the window. If everything went ok, your sessions panel should look similar to this. If it does not then you may need to check your session and make sure that everything properly saved.
Verify your setup
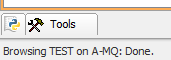
To test the connection, you can simply double click on the queue under your session in the sessions panel. This will open the queue browser for that queue. If you do not get any errors and you see text similar to “Browsing QUEUE_NAME on A-MQ: Done” in the bottom left of the screen, then the connection was successful.
With the queue still selected in the session panel, you can send a simple text message to the queue as a test. Go to Messages and select Send TextMessage. Browse to any text file on your system and select it to be sent. I recommend something small, but any text file should work. After the message has been sent, refresh the queue browser by selecting the refresh Icon on the toolbar. You should now see your new message in the queue browser window.
An Alternative
Now that you have everything working in HermesJMS, I am going to tell you that you didn’t need to do that. Yup, thats right, you just wasted all that time for nothing. The reason is because JBoss A-MQ comes with an amazing management console.
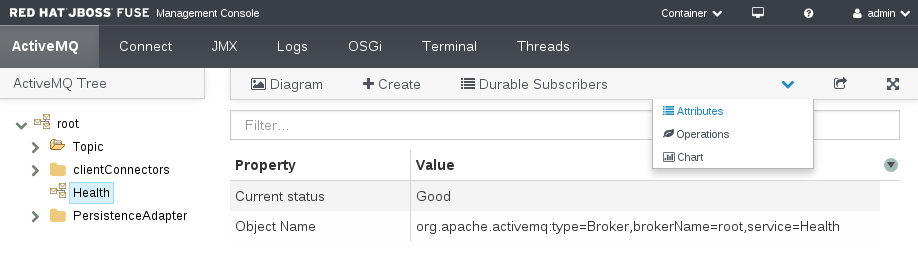
The management console is based on hawtio and can managing your ActiveMQ broker and all of its queues and topics. It is far more full featured than the current versions of HermesJMS (and far less buggy) and requires no additional setup. Unless you absolutely must use HermesJMS (for integrating with SoapUI for instance) I would strongly recommend you save your time fiddling with HermesJMS and use the including admin console.